

Magento 2 – Quick tip : how to log and debug easily
Whatever the development you are doing, and whatever the environment and technology you are working on, you always need to debug your code.
Let's debug Magento 2 with logs.
This is how i have been processing for many times in a magento 2 environment and coding with PhpStorm IDE.
First, i have added 2 simple live templates inside my PhpStorm IDE.
The first one will allow me to temporarily and quickly add a logging function inside my code :
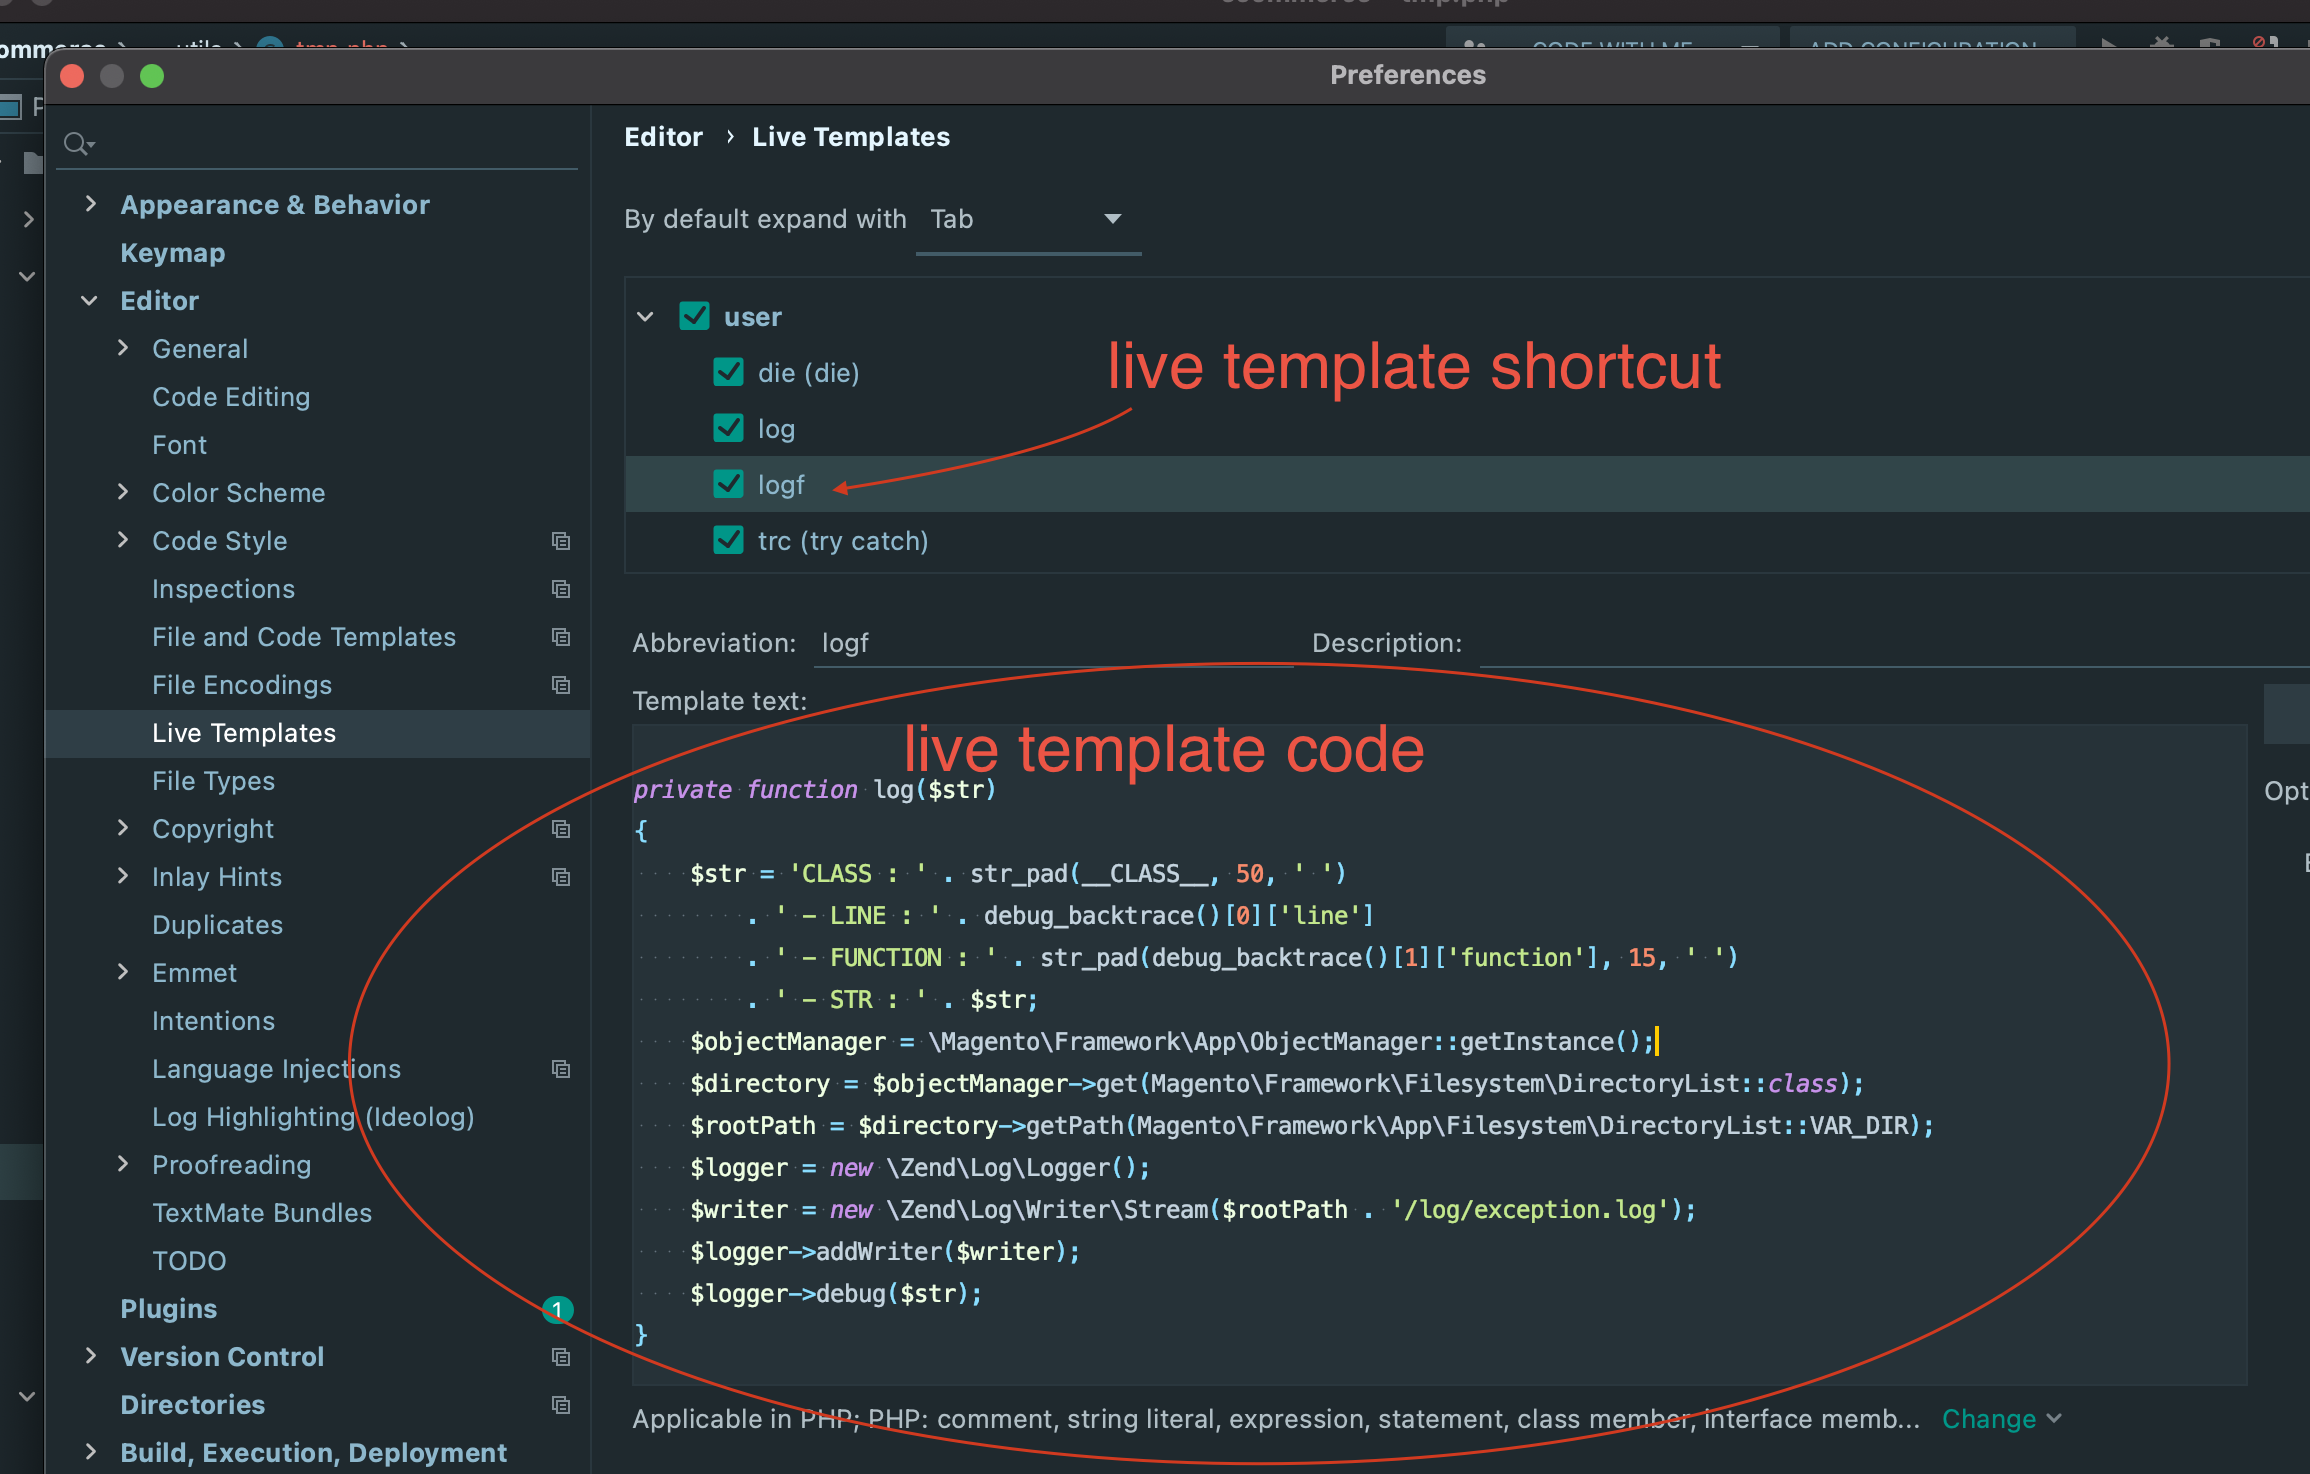
Here is the live template code if you need to copy paste it.
<?php
    private function log($str)
    {
        $str = 'CLASS : ' . str_pad(__CLASS__, 50, ' ')
            . ' - LINE : ' . debug_backtrace()[0]['line']
            . ' - FUNCTION : ' . str_pad(debug_backtrace()[1]['function'], 15, ' ')
            . ' - STR : ' . $str;
        $objectManager = \Magento\Framework\App\ObjectManager::getInstance();
        /** @var \Magento\Framework\Filesystem\DirectoryList $directory */
        $directory = $objectManager->get(\Magento\Framework\Filesystem\DirectoryList::class);
        $rootPath = $directory->getPath(\Magento\Framework\App\Filesystem\DirectoryList::VAR_DIR);
        $logger = new \Zend\Log\Logger();
        $writer = new \Zend\Log\Writer\Stream($rootPath . '/log/exception.log');
        $logger->addWriter($writer);
        $logger->debug($str);
    }
This logging function is not perfect but it allows you to log any info just like we could do with magento 1 and famous Mage::Log function. It also gives a little of contextual information, the PHP class, the PHP method and the line number where the log have been added.
Here is the second live template i have added :
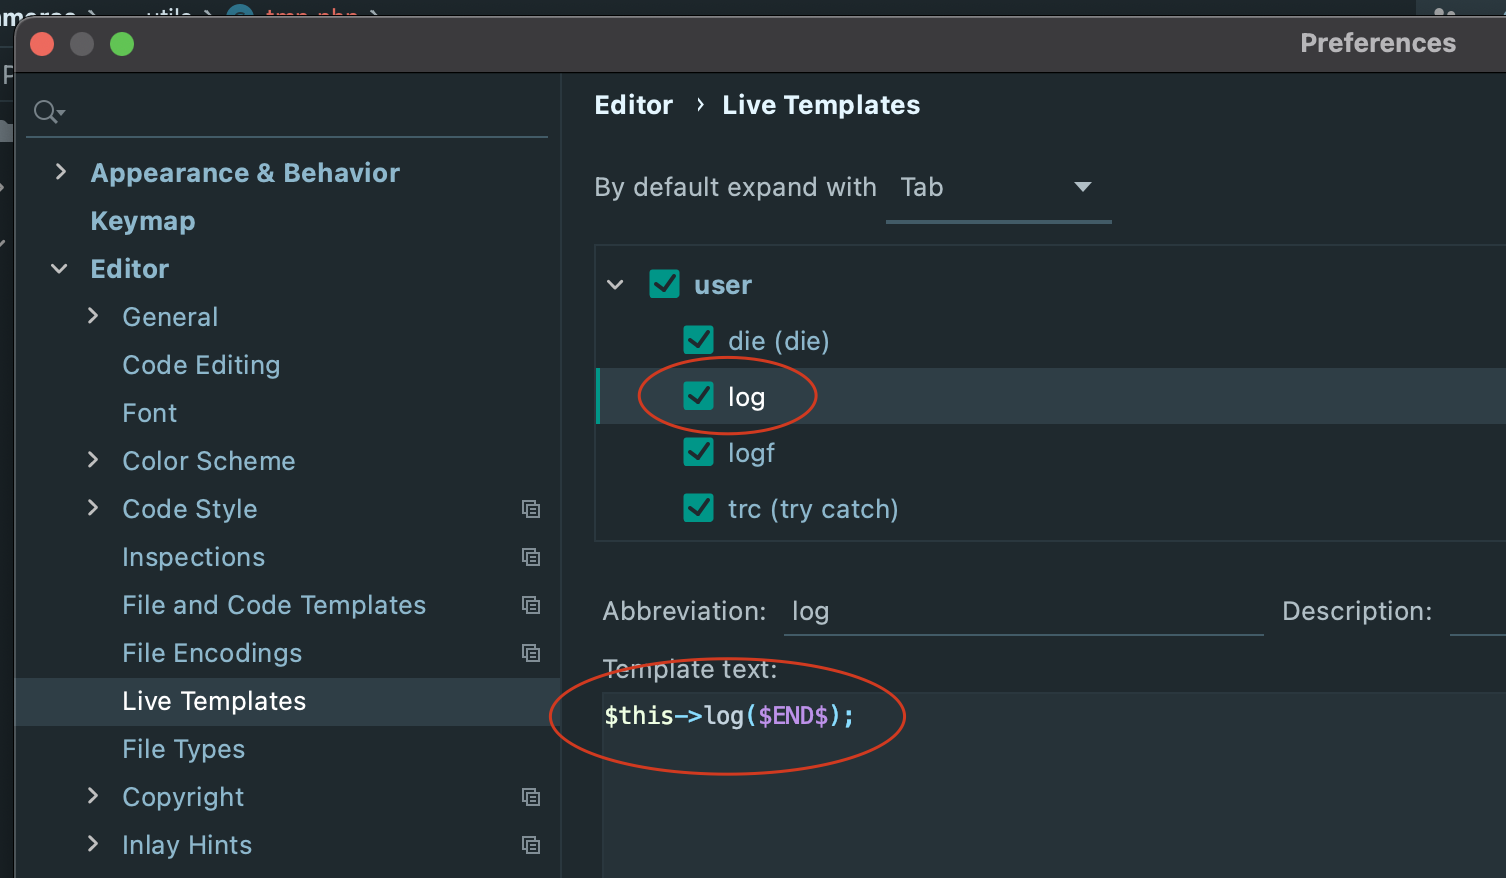
It allows to quickly add a log in the code.
With these 2 live template i can easily and quickly temporarily add log in my code.
Here is how you add the logging function in your code :
And here is how you call it from anywhere in your code :

After that you will just need to open you command line and start a tail -f var/log/exception.log command and you will see the logs coming.
And that's all. Please remember that this is very temporary and must not live inside production code (directly using object manager is not a good practice) so don't forget to remove this function and calls before commiting you code.
Magento 2 – Quick tip : Activate support in PhpStorm
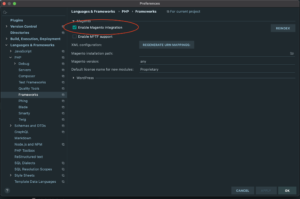
You can enable Magento 2 support in PHPstorm.
Here is in the IDE settings how to enable it.
Go in section Languages & Frameworks > PHP > Frameworks
And check "Enable Magento Integration"
Magento 2 : Totals collection explained
What is it?
Quote Totals collection is an important process in magento.
This process also exists on Invoice and Creditmemo objects but we will only look into detail how it is implemented for the Quote object which is the one you will be more frequently interacting with. This process is very frequent in magento. Basically, it is executed every time a change is done on the cart. It can be:
- in
QuoteModelafterLoadevent - at order placing
\Magento\InstantPurchase\Model\PlaceOrder::placeOrder - when saving a quote item
\Magento\Quote\Model\Quote\Item\Repository::save - and many more places...
What is it for?
The objective of that process is (as it is well named) to collect the totals for the Quote object.
The Quote object is a complex and holds many prices information (grand_total, subtotal, subtotal_with_discount, etc.).
The value of these different prices are calculated using specific rules and are impacted differently.
This is what the total collection does.
How is it implemented?
The Quote instance is the main actor but he is not alone. There is also a TotalsCollector object and many TotalCollector objects that play their role.
Let's see what object owns what and what they are responsible for.
- The
Quoteobject has aTotalsCollector. - The
TotalsCollectorobject has a list ofTotalCollector.
The TotalsCollector is responsible for :
- looping on addresses (in many cases, 2 addresses, one billing and one shipping), see
\Magento\Quote\Model\Quote\TotalsCollector::collect. - executing a list of total collectors for each address, see
\Magento\Quote\Model\Quote\TotalsCollector::collectAddressTotals.
Let's go a little more in detail.
The TotalsCollector initiates a global Total object (\Magento\Quote\Model\Quote\Address\Total).
<?php

/** @var \Magento\Quote\Model\Quote\Address\Total $total */
$total = $this->totalFactory
    ->create(\Magento\Quote\Model\Quote\Address\Total::class);
For each address, the TotalsCollector will get a new Total object that will come to "enrich" the global Total object.
This is done by calling the collect method of each TotalCollector, the resulting Total contains the data for the current address.
These are the data :
shipping_amountbase_shipping_amountshipping_descriptionsubtotalbase_subtotalsubtotal_with_discountbase_subtotal_with_discountgrand_totalbase_grand_total
Depending on the type of each data, it can be used to either increment the same data on the main Total object. This is the case for subtotal for example :$total->setSubtotal((float)$total->getSubtotal() + $addressTotal->getSubtotal());
Or to either simply replace the same data in the main Total object. This is the case for shipping_amount for example :$total->setShippingAmount($addressTotal->getShippingAmount());
There is the list of TotalCollector object that the TotalsCollector natively holds :
Magento\Quote\Model\Quote\Address\Total\SubtotalMagento\Tax\Model\Sales\Total\Quote\SubtotalMagento\Weee\Model\Total\Quote\WeeeMagento\SalesRule\Model\Quote\DiscountMagento\Quote\Model\Quote\Address\Total\ShippingMagento\Tax\Model\Sales\Total\Quote\ShippingMagento\SalesRule\Model\Quote\Address\Total\ShippingDiscountMagento\Tax\Model\Sales\Total\Quote\TaxMagento\Weee\Model\Total\Quote\WeeeTaxMagento\Quote\Model\Quote\Address\Total\Grand
How is it configured?
The list of TotalCollector is loaded from xml config.
See \Magento\Quote\Model\Quote\Address\Total\Collector::__construct
and \Magento\Sales\Model\Config\Ordered::_initCollectors.
Evertything happens in sales.xml file.
You will find a node element like this one : <section name="quote">
In Magento_Quote module :
<section name="quote">
	<group name="totals">
		<item name="subtotal" instance="Magento\Quote\Model\Quote\Address\Total\Subtotal" sort_order="100"/>
		<item name="shipping" instance="Magento\Quote\Model\Quote\Address\Total\Shipping" sort_order="350"/>
		<item name="grand_total" instance="Magento\Quote\Model\Quote\Address\Total\Grand" sort_order="550"/>
	</group>
</section>
And then in Magento_SalesRule module :
<section name="quote">
    <group name="totals">
        <item name="discount" instance="Magento\SalesRule\Model\Quote\Discount" sort_order="300"/>
        <item name="shipping_discount" instance="Magento\SalesRule\Model\Quote\Address\Total\ShippingDiscount" sort_order="400"/>
    </group>
</section>
And then in Magento_Tax module :
<section name="quote">
    <group name="totals">
        <item name="tax_subtotal" instance="Magento\Tax\Model\Sales\Total\Quote\Subtotal" sort_order="200"/>
        <item name="tax_shipping" instance="Magento\Tax\Model\Sales\Total\Quote\Shipping" sort_order="375"/>
        <item name="tax" instance="Magento\Tax\Model\Sales\Total\Quote\Tax" sort_order="450"/>
    </group>
</section>
And then in Magento_Weee module :
<section name="quote">
    <group name="totals">
        <item name="weee" instance="Magento\Weee\Model\Total\Quote\Weee" sort_order="225"/>
        <item name="weee_tax" instance="Magento\Weee\Model\Total\Quote\WeeeTax" sort_order="460"/>
    </group>
</section>
If I cumulate these configurations, we will have that :
<section name="quote">
    <group name="totals">
        <item name="subtotal" instance="Magento\Quote\Model\Quote\Address\Total\Subtotal" sort_order="100"/>
        <item name="tax_subtotal" instance="Magento\Tax\Model\Sales\Total\Quote\Subtotal" sort_order="200"/>
        <item name="weee" instance="Magento\Weee\Model\Total\Quote\Weee" sort_order="225"/>
        <item name="discount" instance="Magento\SalesRule\Model\Quote\Discount" sort_order="300"/>
        <item name="shipping" instance="Magento\Quote\Model\Quote\Address\Total\Shipping" sort_order="350"/>
        <item name="tax_shipping" instance="Magento\Tax\Model\Sales\Total\Quote\Shipping" sort_order="375"/>
        <item name="shipping_discount" instance="Magento\SalesRule\Model\Quote\Address\Total\ShippingDiscount" sort_order="400"/>
        <item name="tax" instance="Magento\Tax\Model\Sales\Total\Quote\Tax" sort_order="450"/>
        <item name="weee_tax" instance="Magento\Weee\Model\Total\Quote\WeeeTax" sort_order="460"/>
        <item name="grand_total" instance="Magento\Quote\Model\Quote\Address\Total\Grand" sort_order="550"/>
    </group>
</section>
For order_invoice and order_creditmemo, we will find the same types of xml declarations.
For order_invoice :
<section name="order_invoice">
    <group name="totals">
        <item name="subtotal" instance="Magento\Sales\Model\Order\Invoice\Total\Subtotal" sort_order="50"/>
        <item name="discount" instance="Magento\Sales\Model\Order\Invoice\Total\Discount" sort_order="100"/>
        <item name="shipping" instance="Magento\Sales\Model\Order\Invoice\Total\Shipping" sort_order="150"/>
        <item name="tax" instance="Magento\Sales\Model\Order\Invoice\Total\Tax" sort_order="200"/>
        <item name="cost_total" instance="Magento\Sales\Model\Order\Invoice\Total\Cost" sort_order="250"/>
        <item name="grand_total" instance="Magento\Sales\Model\Order\Invoice\Total\Grand" sort_order="350"/>
    </group>
</section>
For order_creditmemo :
<section name="order_creditmemo">
    <group name="totals">
        <item name="subtotal" instance="Magento\Sales\Model\Order\Creditmemo\Total\Subtotal" sort_order="50"/>
        <item name="discount" instance="Magento\Sales\Model\Order\Creditmemo\Total\Discount" sort_order="150"/>
        <item name="shipping" instance="Magento\Sales\Model\Order\Creditmemo\Total\Shipping" sort_order="200"/>
        <item name="tax" instance="Magento\Sales\Model\Order\Creditmemo\Total\Tax" sort_order="250"/>
        <item name="cost_total" instance="Magento\Sales\Model\Order\Creditmemo\Total\Cost" sort_order="300"/>
        <item name="grand_total" instance="Magento\Sales\Model\Order\Creditmemo\Total\Grand" sort_order="400"/>
    </group>
</section>
Conclusion
The total collection is an important process in Magento and it's good to know how it works a bit because you will certainly be interacting with it at one point or another as a magento developer. It is used in magento natively to handle the things that are not the cart items but that impact the total price. This is how the shipping is handled and also the wee tax (Waste Electrical and Electronic Equipment) but you could imagine using it also for you own needs some day.
ElasticSearch / Magento 2 – various commands
Magento 2 uses ElasticSearch as a search engine.
It can be helpfull to directly request ElasticSearch to verify the data that have been indexed.
First you can get all indices.
In the command below ElastichSearch is accessible on host name 'elasticsearch' and on port 9200.
curl -X GET 'http://elasticsearch:9200/_cat/indices?v'
This will return the following data :
health status index                  uuid                   pri rep docs.count docs.deleted store.size pri.store.size
yellow open   magento2_product_3_v10 h3qCDZVzT16OTOZAx3pMuA   1   1          0            0       208b           208b
yellow open   magento2_product_2_v10 uppg4DzLRSeNdf5HrgHcQg   1   1        189            0     79.4kb         79.4kb
yellow open   magento2_product_1_v10 nh8ckn7kS8-3l-F9dX8Tkw   1   1          0            0       208b           208b
You can then request documents in a specific indice.
Here for example, we are getting the 10 first documents in the indice magento2_product_2_v10.
curl -X GET --header 'Content-Type: application/json' \
http://elasticsearch:9200/magento2_product_2_v10/_search -d '{"size" : 10}'
The response look like that :
{
    "took": 3,
    "timed_out": false,
    "_shards": {
        "total": 1,
        "successful": 1,
        "skipped": 0,
        "failed": 0
    },
    "hits": {
        "total": {
            "value": 189,
            "relation": "eq"
        },
        "max_score": 1.0,
        "hits": [
          ...
        ]
    }
}
You can se that the total number of documents that is returned in the "hits" > "total" field.
A hit structure will look like that :
{
    "_index": "magento2_product_2_v10",
    "_type": "document",
    "_id": "1692",
    "_score": 1.0,
    "_source": {
        "store_id": "2",
        "options": [
            "Prod 1"
        ],
        "sku": "prod_sku_1",
        "category_ids": [
            2
        ],
        "position_category_2": "0",
        "name_category_2": "Default Category"
        }
},
You can get documents using a query. Below we are requesting the documents in category 3.
curl -XGET --header 'Content-Type: application/json' http://elasticsearch:9200/magento2_product_2_v10/_search \
-d '{"query" : {"bool": {"must": [{"term": {"category_ids": "3"}}]}}}'
Magento 2 : create new stores using a store create processor
I have previously already created a post with a code example that show how to create stores programmaticaly. Here is this previous post : https://www.addeos.com/magento-2-create-a-store-storegroup-website-programmaticaly
Here I present an other way of doing if using a native create processor present in Magento_Store module.
We are going to use a helper that contains the logic for creating new stores.
This helper holds the native processor. It passes a data table to it and execute its run method.
<?php
/**
 * @author Didier Berlioz
 * Copyright (c) Addeos All rights reserved.
 */

namespace Addeos\Store\Helper;

use Exception;
use Magento\Framework\App\Helper\AbstractHelper;
use Magento\Framework\App\Helper\Context;
use Magento\Store\Api\StoreRepositoryInterface;
use Magento\Store\Model\Config\Importer\Processor\Create;
use Magento\Store\Model\ResourceModel\Store as StoreModel;
use Psr\Log\LoggerInterface;

class Store extends AbstractHelper
{

    /**
     * @var Create
     */
    private $storeCreateProcessor;

    /**
     * @var StoreRepositoryInterface
     */
    private $storeRepository;

    /**
     * @var StoreModel
     */
    private $storeResourceModel;

    /**
     * @var LoggerInterface
     */
    private $logger;

    /**
     * @var ConfigInterface
     */
    private $config;

    /**
     * Store constructor.
     * @param Context $context
     * @param Create $storeCreateProcessor
     * @param StoreRepositoryInterface $storeRepository
     * @param StoreModel $storeResourceModel
     * @param LoggerInterface $logger
     */
    public function __construct(
        Context $context,
        Create $storeCreateProcessor,
        StoreRepositoryInterface $storeRepository,
        StoreModel $storeResourceModel,
        LoggerInterface $logger
    ) {
        parent::__construct($context);
        $this->storeCreateProcessor = $storeCreateProcessor;
        $this->storeRepository = $storeRepository;
        $this->storeResourceModel = $storeResourceModel;
        $this->logger = $logger;
    }

    public function createStores($data)
    {
        try {
            $this->storeCreateProcessor->run($data);
            foreach ($data['stores'] as $storeData) {
                $this->updateStore($storeData['code'], $storeData['group_id'], $storeData['website_id']);
            }
        } catch (Exception $e) {
            $this->logger->error(__FILE__ . ' : ' . $e->getMessage());
        }
    }

    private function updateStore($code, $groupId, $websiteId): void
    {
        try {
            $store = $this->storeRepository->get($code);
            $store->setStoreGroupId($groupId);
            $store->setWebsiteId($websiteId);
            $this->storeResourceModel->save($store);
        } catch (Exception $e) {
            $this->logger->error(__FILE__ . ' : ' . $e->getMessage());
        }
    }
And then an installer that will use that helper. What this installer does is basically building the data and passing it to the helper.
In that example, we are creating 2 new websites which each have a group and a store.
<?php
/**
 * @author Didier Berlioz
 * Copyright (c) Addeos All rights reserved.
 */

namespace Addeos\Store\Setup;

use Magento\Framework\Setup\InstallDataInterface;
use Magento\Framework\Setup\ModuleContextInterface;
use Magento\Framework\Setup\ModuleDataSetupInterface;
use Addeos\Store\Helper\Store;

class InstallData implements InstallDataInterface
{
    const FIRST_STORE_ID = 8;
    const SECOND_STORE_ID = 9;
    const FIRST_WEBSITE_ID = 6;
    const SECOND_WEBSITE_ID = 7;
    const FIRST_GROUP_ID = 6;
    const SECOND_GROUP_ID = 7;
    const FIRST_STORE_COUNTRY = 'DE';
    const SECOND_STORE_COUNTRY = 'AT';
    const FIRST_STORE_LOCALE = 'de_DE';
    const SECOND_STORE_LOCALE = 'at_DE';
    const ROOT_CATEGORY_ID = 2;

    /**
     * @var Store
     */
    private $storeHelper;

    /**
     * InstallData constructor.
     * @param Store $storeHelper
     */
    public function __construct(Store $storeHelper)
    {
        $this->storeHelper = $storeHelper;
    }

    /**
     * @inheritDoc
     */
    public function install(ModuleDataSetupInterface $setup, ModuleContextInterface $context)
    {
        $this->storeHelper->createStores($this->getMyStoresData());
    }

    /**
     * @return array
     */
    private function getMyStoresData(): array
    {
        return [
            'websites' => [
                [
                    'website_id' => self::FIRST_WEBSITE_ID,
                    'code' => 'first_website_code',
                    'name' => 'First website name',
                    'sort_order' => 4,
                    'default_group_id' => self::FIRST_GROUP_ID,
                    'is_default' => 0,
                ],
                [
                    'website_id' => self::SECOND_WEBSITE_ID,
                    'code' => 'second_website_code',
                    'name' => 'Second website name',
                    'sort_order' => 5,
                    'default_group_id' => self::SECOND_GROUP_ID,
                    'is_default' => 0,
                ],
            ],
            'groups' => [
                [
                    'group_id' => self::FIRST_GROUP_ID,
                    'website_id' => self::FIRST_WEBSITE_ID,
                    'code' => 'first_group_code',
                    'name' => 'First group name',
                    'root_category_id' => self::ROOT_CATEGORY_ID,
                    'default_store_id' => self::FIRST_STORE_ID,
                ],
                [
                    'group_id' => self::SECOND_GROUP_ID,
                    'website_id' => self::SECOND_WEBSITE_ID,
                    'code' => 'second_group_code',
                    'name' => 'Second group name',
                    'root_category_id' => self::ROOT_CATEGORY_ID,
                    'default_store_id' => self::SECOND_STORE_ID,
                ],
            ],
            'stores' => [
                [
                    'store_id' => self::FIRST_STORE_ID,
                    'code' => 'first-store-code',
                    'website_id' => self::FIRST_WEBSITE_ID,
                    'group_id' => self::FIRST_GROUP_ID,
                    'name' => 'First store name',
                    'sort_order' => 0,
                    'is_active' => 0,
                    'locale' => self::FIRST_STORE_LOCALE,
                    'country' => self::FIRST_STORE_COUNTRY,
                ],
                [
                    'store_id' => self::SECOND_STORE_ID,
                    'code' => 'second-store-code',
                    'website_id' => self::SECOND_WEBSITE_ID,
                    'group_id' => self::SECOND_GROUP_ID,
                    'name' => 'Second store name',
                    'sort_order' => 0,
                    'is_active' => 0,
                    'locale' => self::SECOND_STORE_LOCALE,
                    'country' => self::SECOND_STORE_COUNTRY,
                ],
            ],
        ];
    }
}Magento 2 : Database anonymization module
This is my first module deployed on packagist.
This module once installed will offer a new command for anonymizing the database.
This can be useful on a development environment when the database has been retrieved from a production environment. It will anonymize all the customer's data (replace personal data) to be compatible on a GDPR point of view.
Install the module using composer :
composer require addeos/anonymize
Once the module is installed on your magento, simply call it using the following command :
php bin/magento addeos:anonymize
After execution is done, all your customer personal data will be transformed.
This must not be executed on a production environment!
Sometimes, some magento application can be set on production application mode even if the magento is not a production application. This can be on a preproduction magento for example.
In this case, there is a safety that will prevent the command to work but you can still call the command with a -f 1 option
php bin/magento addeos:anonymize -f 1
Magento 2 : How to add a knockout component
We can add a knockout component to add some javascript behaviour in our pages. This is how to do it step by step.
1 . In the existing template, in which you want to include the knockout component, you first need to declare the component using the declarative notation and using the <script type="text/x-magento-init" /> tag.
This allows you to specify the component, basically the js file and the associated template.
<script type="text/x-magento-init">
    {
        "#demo-component-container": {
            "Magento_Ui/js/core/app": {
               "components": {
                    "demo-ko-component": {
                        "component" : "MyNamespace_MyModule/js/ko-component",
                        "config" : {
                            "template":  "MyNamespace_MyModule/ko-template"
                        }
                    }
                }
            }
        }
    }
</script>
2. In the same template, you then need to declare the container that will receive the component.
<div id="demo-component-container" data-bind="scope: 'demo-ko-component'">
    <!-- ko template: getTemplate() --><!-- /ko -->
</div>
3. You need to create the js component.
It has to be place in app/code/MyNamespace/MyModule/view/frontend/web/js/ko-component.js.
For the purpose of the example, we are simply setting a property inputValue that we will use in the template.
/**
 * @license http://opensource.org/licenses/osl-3.0.php  Open Software License (OSL 3.0)
 * @author Didier Berlioz <berliozd@gmail.com>
 * @copyright Copyright (c) 2016 Addeos (http://www.addeos.com)
 */

define(['jquery', 'uiComponent', 'ko'], function ($, Component, ko) {
        'use strict';
        return Component.extend({
            initialize: function () {
                this._super();
                this.inputValue = ko.observable('my input value');
            }
        });
    }
);
4. You need to create the component template.
It will be placed here app/code/Namespace/Module/view/frontend/web/template/ko-template.html .
As said earlier, in the template we will just bind an input tag with the property inputValue set in the js component.
<p>Here is my knockout template.</p>
<input type="text" data-bind="value: inputValue">
And that's all.
Magento 2 : How to create a store, a store group and a website programmatically
Whenever it comes during your projects, you can need to create a new store, a new store group and a new website. You can do it programmatically.
A store refers a store group to which "it is part" and a store group refers a website to "which it is part". But a website also refers a default store group and and store group refers a default store.
You then need to decide what entity to create first, refer to other entities and then change the references after having created the final entities. The solution I have decided to use is to create the website, then the store group and finally the store.
The following code have to be place in an installer file (InstallData.php or UpgradeData.php placed in the Setup folder of a module. The class have to implements either \Magento\Framework\Setup\UpgradeDataInterface or \Magento\Framework\Setup\InstallDataInterface.
<?php

namespace Addeos\Core\Setup;

use Magento\Framework\Event\ManagerInterface;
use Magento\Framework\Setup\ModuleContextInterface;
use Magento\Framework\Setup\ModuleDataSetupInterface;
use Magento\Framework\Setup\UpgradeDataInterface;
use Magento\Store\Model\ResourceModel\Group as GroupResourceModel;
use Magento\Store\Model\ResourceModel\Store as StoreResourceModel;
use Magento\Store\Model\ResourceModel\Website as WebsiteResourceModel;
use Magento\Store\Model\GroupFactory;
use Magento\Store\Model\StoreFactory;
use Magento\Store\Model\WebsiteFactory;

class UpgradeData implements UpgradeDataInterface
{

    /**
     * UpgradeData constructor.
     * @param Installer $installer
     * @param ManagerInterface $eventManager
     * @param WebsiteResourceModel $websiteModel
     * @param GroupResourceModel $groupModel
     * @param StoreResourceModel $storeModel
     * @param WebsiteFactory $websiteFactory
     * @param GroupFactory $groupFactory
     * @param StoreFactory $storeFactory
     */
    public function __construct(
        Installer $installer,
        ManagerInterface $eventManager,
        WebsiteResourceModel $websiteModel,
        GroupResourceModel $groupModel,
        StoreResourceModel $storeModel,
        WebsiteFactory $websiteFactory,
        GroupFactory $groupFactory,
        StoreFactory $storeFactory,
    ) {
        $this->installer = $installer;
        $this->eventManager = $eventManager;
        $this->websiteResourceModel = $websiteModel;
        $this->groupResourceModel = $groupModel;
        $this->storeResourceModel = $storeModel;
        $this->websiteFactory = $websiteFactory;
        $this->groupFactory = $groupFactory;
        $this->storeFactory = $storeFactory;
    }

    public function upgrade(ModuleDataSetupInterface $setup, ModuleContextInterface $context)
    {
        if (version_compare($context->getVersion(), '1.0.4', '<')) {
            $this->createEntities();
        }
    }

    private function createEntities()
    {
        /** @var Magento\Store\Model\Website $website */
        $website = $this->websiteFactory->create();
        $website->setCode('website_code');
        $website->setName('website name');
        // Set an existing store group id
        $website->setDefaultGroupId(2);
        $this->websiteResourceModel->save($website);

        /** @var \Magento\Store\Model\Group $group */
        $group = $this->groupFactory->create();
        $group->setWebsiteId($website->getWebsiteId());
        $group->setName('store group name');
        // Set the category id for the root category of the store group
        $group->setRootCategoryId(2);
        // Set an existing store id
        $group->setDefaultStoreId(3);
        $this->groupResourceModel->save($group);

        /** @var \Magento\Store\Model\Store $store */
        $store = $this->storeFactory->create();
        $store->setCode('store_code');
        $store->setName('store name');
        $store->setWebsite($website);
        $store->setGroupId($group->getId());
        $store->setData('is_active', '1');
        $this->storeResourceModel->save($store);
        $this->eventManager->dispatch('store_add', ['store' => $store]);

        // change the default group id for the website
        $website->setDefaultGroupId($group->getId());
        $this->websiteResourceModel->save($website);

        // change the default store id for the store group
        $group->setDefaultStoreId($store->getId());
        $this->groupResourceModel->save($group);
    }

}
Magento 2 : How to add and update a database table column
It's often necessary to update database tables when working on module. We can need to add columns or update some of them.
The following codes have to be in the installer files of the module you are working in. They can be either InstallSchema.php or UpgradeSchema.php. These files have to be placed in the Setup folder of the module.
In the following code example, we are adding a column to an existing table. We assume we are working on a newly created module that hasn't been installed yet. Therefore we are working on the InstallSchema.php file. The implemented function is "install".
<?php

namespace Addeos\MyModule\Setup;

use Magento\Framework\DB\Ddl\Table;
use Magento\Framework\Setup\ModuleContextInterface;
use Magento\Framework\Setup\SchemaSetupInterface;
use Magento\Framework\Setup\InstallSchemaInterface;

class InstallSchema implements InstallSchemaInterface
{
    public function install(SchemaSetupInterface $setup,
        ModuleContextInterface $context)
    {
        $installer->getConnection()
            ->addColumn($installer->getTable('my_table_name'),
                'my_column_name',
                [
                    'type' => Table::TYPE_SMALLINT,
                    'nullable' => false,
                    'comment' => 'Write here a comment that will
                        be visible in when looking at the table info in mysql'
                ]);
    }
}
Here we are updating a column in the same table. We are then upgrading the module which has already been installed. Therefore, we are in the UpdgradeSchema.php file. We assume this new version will be 1.0.1. The implemented function is "upgrade" this time.
<?php

namespace Addeos\MyModule\Setup;

use Magento\Framework\DB\Ddl\Table;
use Magento\Framework\Setup\ModuleContextInterface;
use Magento\Framework\Setup\SchemaSetupInterface;
use Magento\Framework\Setup\UpgradeSchemaInterface;

class UpgradeData implements UpgradeDataInterface
{
    public function upgrade(SchemaSetupInterface $setup,
        ModuleContextInterface $context)
    {
        if (version_compare($context->getVersion(), '1.0.1', '<')) {
            $setup->getConnection()
                ->changeColumn(
                    $installer->getTable('my_table_name'),
                    'my_column_name',
                    'my_column_name', [
                        'type' => Table::TYPE_SMALLINT,
                        'nullable' => true,
                        'comment' => 'You still have to write again the comment
                            otherwise it be lost.'
                    ]
                );
        }

    }
}Magento 2 : How to add a logging function when debugging
When debugging, it might be necessary to add some logs.
Here is a simple way to add a logging function in your code.
Warning :
This is not supposed to stay in your code and is only for debugging purpose.
There are better and more integrated ways of doing it
<?php
/**
* @param $str
*/
private function log($str) {
    $str = 'CLASS : ' . str_pad(__CLASS__, 50, ' ')
            . ' - LINE : ' . str_pad(debug_backtrace()[0]['line'], 4, ' ')
            . ' - FUNCTION : ' . str_pad(debug_backtrace()[1]['function'] , 15, ' ')
            . ' - STR : ' . $str;
    $objectManager = \Magento\Framework\App\ObjectManager::getInstance();
    /** @var \Magento\Framework\Filesystem\DirectoryList $directory */
    $directory = $objectManager->get('\Magento\Framework\Filesystem\DirectoryList');
    $rootPath = $directory->getPath(\Magento\Framework\App\Filesystem\DirectoryList::VAR_DIR);
    $logger = new \Zend\Log\Logger();
    $writer = new \Zend\Log\Writer\Stream($rootPath . '/log/zendlog.log');
    $logger->addWriter($writer);
    $logger->debug($str);
}