

Magento 2 – Tutorial : new model – Part 2 – creating the PHP classes
Introduction
This article is the 2nd part of a series in which I go through the procedure to create a new model in magento 2, with its own magento 2 admin grid in the Back Office.
You can go back to the first part if you wish.
As a preamble, I have to say that this tutorial series has been developed and tested with Magento version 2.4.2.
I remind you that for the purpose of the article I am going to create a "provider" model and that our code will be contained in an "Addeos_ModelTutorial" module.
In the first part I have explained how to create the DB table using declarative XML. In this second part, I will create the PHP classes :
- the API data interface
- the model that implements the interface
- the resource model
- the collection resource model
Creating the API data interface
If we want to respect the concept of service contracts which is a good thing and recommanded by Magento, I need to create some PHP interfaces first. Here is some more details about service contracts.
By convention, these PHP interfaces have to be in an Api folder and a Data folder for data interfaces.
The first interface to create is the ProviderInterface : Api/Data/ProviderInterface.php.
Here is the code :
<?php

declare(strict_types=1);

namespace Addeos\ModelTutorial\Api\Data;

/**
 * @api
 */
interface ProviderInterface
{
    const ENTITY_ID = 'entity_id';
    const CREATED_AT = 'created_at';
    const UPDATED_AT = 'updated_at';
    const NAME = 'name';
    const DESCRIPTION = 'description';

    public function getEntityId(): ?int;

    public function setEntityId(int $entityId);

    public function getName(): ?string;

    public function setName(string $name);

    public function getDescription(): ?string;

    public function setDescription(string $description);

    public function getCreatedAt(): ?string;

    public function setCreatedAt(string $createdAt);

    public function getUpdatedAt(): ?string;

    public function setUpdatedAt(string $updatedAt);

}
Creating the PHP model
I then need to create the PHP model that will implement the interface we have just created. This PHP class will extend \Magento\Framework\Model\AbstractModel.
Here is the code :
<?php
declare(strict_types=1);

namespace Addeos\ModelTutorial\Model;

use Addeos\ModelTutorial\Api\Data\ProviderInterface;
use Magento\Framework\Model\AbstractModel;

class Provider extends AbstractModel implements ProviderInterface
{

    public function getName(): ?string
    {
        return $this->getData(self::NAME);
    }

    public function setName(string $name)
    {
        $this->setData(self::NAME, $name);
    }

    public function getDescription(): ?string
    {
        return $this->getData(self::DESCRIPTION);
    }

    public function setDescription(string $description)
    {
        $this->setData(self::DESCRIPTION, $description);
    }

    public function getCreatedAt(): ?string
    {
        return $this->getData(self::CREATED_AT);
    }

    public function setCreatedAt(string $createdAt)
    {
        $this->setData(self::CREATED_AT, $createdAt);
    }

    public function getUpdatedAt(): ?string
    {
        return $this->getData(self::CREATED_AT);
    }

    public function setUpdatedAt(string $updatedAt)
    {
        $this->setData(self::UPDATED_AT, $updatedAt);
    }
}
Creating the resource model
I now need to create resource model.
The file is Model/ResourceModel/Provider.php.
Here is the code :
<?php
declare(strict_types=1);

namespace Addeos\ModelTutorial\Model\ResourceModel;

use Magento\Framework\Model\ResourceModel\Db\AbstractDb;

class Provider extends AbstractDb
{
    protected function _construct()
    {
        $this->_init('addeos_provider', 'entity_id');
    }
}
Creating the collection resource model
I now need to create the provider collection resource model.
The file is ModelResourceModel/Provider/Collection.php.
Her is the code :
<?php

namespace Addeos\ModelTutorial\Model\ResourceModel\Provider;

use Addeos\ModelTutorial\Model\Provider;
use Addeos\ModelTutorial\Model\ResourceModel\Provider as ProviderResourceModel;
use Magento\Framework\Model\ResourceModel\Db\Collection\AbstractCollection;

class Collection extends AbstractCollection
{
    protected $_idFieldName = 'entity_id';
    protected $_eventPrefix = 'addeos_provider_collection';
    protected $_eventObject = 'addeos_provider_collection';

    protected function _construct()
    {
        $this->_init(Provider::class, ProviderResourceModel::class);
    }
}
And that's all. From that point we have all the necessary classes for now.
In next post, I will explain now how to create the grid in Back Office to visualize the data of our new table.
Magento 2 – Tutorial : adding a new model – Part 1 – creating the DB table
Introduction
Here is the first post of a series during which I will got through all the procedure to create a new model in magento 2, with its own grid in the Back Office.
Here are the steps we will have to through :
- Creating the DB table
- Creating the API data object
- Creating the model
- Creating the resource model
- Creating the collection resource model
- Creating the grid
I will cover all these steps in a series of posts.
As a preamble, I have to say that this tutorial series has been developed and tested with Magento version 2.4.2.
For the purpose of the series, we will create a simple model for a "provider" entity with the following columns :
- id : the provider unique identifier
- created_at : the date the provider was created
- updated_at : the date the provider was updated
- name : the provider name
- description : the provider description
We will assume that our code will be held in a module Addeos_ModelTutorial.
Creating the table in DB
Rather than using InstallSchema.php file we can now use XML declarative schema definition for creating new tables, or even updating existing tables. This is available since Magento version 2.3.
We will create a db_schema.xml file.
He is the content of the file:
<?xml version="1.0"?>
<schema xmlns:xsi="http://www.w3.org/2001/XMLSchema-instance"
        xsi:noNamespaceSchemaLocation="urn:magento:framework:Setup/Declaration/Schema/etc/schema.xsd">
    <table name="addeos_provider" resource="default" engine="innodb" comment="Porviders">
        <column xsi:type="int" name="entity_id" padding="10" unsigned="true" nullable="false" identity="true"
                comment="Entity ID"/>
        <column xsi:type="timestamp" name="created_at" on_update="false" nullable="false" default="CURRENT_TIMESTAMP"
                comment="Created At"/>
        <column xsi:type="timestamp" name="updated_at" on_update="false" nullable="false" default="CURRENT_TIMESTAMP"
                comment="Updated At"/>
        <column xsi:type="varchar" name="name" nullable="true" comment="Name" length="50"/>
        <column xsi:type="varchar" name="description" nullable="true" comment="Description" length="50"/>
        <constraint xsi:type="primary" referenceId="PRIMARY">
            <column name="entity_id"/>
        </constraint>
        <index referenceId="ADDEOS_PROVIDER_ENTITY_ID" indexType="btree">
            <column name="entity_id"/>
        </index>
    </table>
</schema>
More information on declarative schema can be found here.
Once this file is in place, you will simply need to run a setup upgrade command from your magento installation root directory :
bin/magento setup:upgrade --keep-generated
Once this is done, your new table will be present in DB.
And this is all for that first step.
In the next post I explain the different PHP classes we need to create.
Magento 2 – Quick tip : how to quickly execute any magento 2 code in command line
The solution I am about to present allows you to execute any magento 2 code from command line.
While developing on magento 2, the code you are working on can be difficult to access and test because it sometimes needs to be executed in a specific context or after having clicked several times to access a specific page. That's why you often need to test some code without being obliged to go all the way.
I simply use a simple PHP script that can be executed in command line.
Here is a the empty structure of this script :
<?php

require '/var/www/html/app/bootstrap.php';

use Magento\Framework\App\Bootstrap;

class tmp
{

    public function __construct()
    {
        $params = $_SERVER;
        $bootstrap = Bootstrap::create(BP, $params);
        $obj = $bootstrap->getObjectManager();
    }

    public function execute()
    {

    }
}

$script = new tmp();
$script->execute();
I store this file in my magento folder in a __utils folder, name it tmp.ph for example and execute it like that :

I won't go into details but I run the previous command in the PHP docker container where magento runs. Prior to running the commande, I have to cd in the magento root.
This can be very helpful because it allows you to execute some code out of any context and really isolate a specific process and identify why potential bugs occurs, but also it can handy if you want to :
- test and debug patch code before writing a proper patch
- execute SQL statement
- verify collections contents
- automatise test data creation (product, sales rules or any other entities)
- check some third party API calls
Here is a full example.
<?php

require '/var/www/html/app/bootstrap.php';

use Magento\Catalog\Api\ProductRepositoryInterface;
use Magento\Customer\Model\ResourceModel\CustomerRepository;
use Magento\Framework\App\Bootstrap;
use Magento\Framework\App\State;
use Magento\Framework\DataObject;
use Magento\Framework\ObjectManagerInterface;
use Magento\Quote\Api\CartManagementInterface;
use Magento\Quote\Model\Quote;
use Magento\Quote\Model\ResourceModel\Quote\Payment;
use Magento\QuoteGraphQl\Model\Cart\AssignBillingAddressToCart;
use Magento\QuoteGraphQl\Model\Cart\AssignShippingAddressToCart;
use Magento\QuoteGraphQl\Model\Cart\AssignShippingMethodToCart;
use Magento\QuoteGraphQl\Model\Cart\CreateEmptyCartForCustomer;
use Magento\QuoteGraphQl\Model\Cart\GetCartForUser;
use Magento\QuoteGraphQl\Model\Cart\QuoteAddressFactory;
use Magento\Store\Model\App\Emulation;
use Magento\Quote\Model\QuoteManagement;

class createOrder
{
    private State $state;
    private ObjectManagerInterface $objectManager;
    private CustomerRepository $customerRepository;
    private CreateEmptyCartForCustomer $createEmptyCartforCustomer;
    private GetCartForUser $getCartForUser;
    private Emulation $emulation;
    private ProductRepositoryInterface $productRepository;
    private QuoteManagement $quoteManagement;
    private QuoteAddressFactory $quoteAddressFactory;
    private AssignShippingAddressToCart $assignShippingAddressToCart;
    private AssignBillingAddressToCart $assignBillingAddressToCart;
    private AssignShippingMethodToCart $assignShippingMethodToCart;
    private Payment $resourcePayment;
    private \Magento\Quote\Model\ResourceModel\Quote $quoteResourceModel;
    private CartManagementInterface $cartManagement;

    public function __construct()
    {
        $params = $_SERVER;
        $bootstrap = Bootstrap::create(BP, $params);
        $obj = $bootstrap->getObjectManager();
        $this->state = $obj->get(State::class);
        $this->state->setAreaCode('frontend');

        $obj = $bootstrap->getObjectManager();
        $this->objectManager = $obj;
        $this->customerRepository = $obj->get(CustomerRepository::class);
        $this->createEmptyCartforCustomer = $obj->get(CreateEmptyCartForCustomer::class);
        $this->getCartForUser = $obj->get(GetCartForUser::class);
        $this->emulation = $obj->get(Emulation::class);
        $this->emulation->startEnvironmentEmulation(3);
        $this->productRepository = $obj->get(ProductRepositoryInterface::class);
        $this->quoteManagement = $obj->get(QuoteManagement::class);
        $this->quoteAddressFactory = $obj->get(QuoteAddressFactory::class);
        $this->assignBillingAddressToCart = $obj->get(AssignBillingAddressToCart::class);
        $this->assignShippingAddressToCart = $obj->get(AssignShippingAddressToCart::class);
        $this->assignShippingMethodToCart = $obj->get(AssignShippingMethodToCart::class);
        $this->resourcePayment = $obj->get(Payment::class);
        $this->quoteResourceModel = $obj->get(\Magento\Quote\Model\ResourceModel\Quote::class);
        $this->cartManagement = $obj->get(CartManagementInterface::class);
    }

    public function execute()
    {
        $customer = $this->customerRepository->get('customer@example.com', 3);

        // Create empty cart
        $maskedCartId = $this->createEmptyCartforCustomer->execute($customer->getId());

        // Get cart
        /** @var Quote $cart */
        $cart = $this->getCartForUser->execute($maskedCartId, $customer->getId(), 3);

        // Add bundle to cart
        $bundleRequest = ['bundle_option' => [578 => 1122]];
        $bundle = $this->productRepository->get('bundle_sku');
        $cart->addProduct($bundle, new DataObject($bundleRequest));

        $this->quoteResourceModel->save($cart);
        $quote = $this->cartManagement->getCartForCustomer($customer->getId());

        $addressInputBilling = [
            'country_code' => "FR",
            'street' => ["55 billing street"],
            'telephone' => "0123456789",
            'postcode' => "75000",
            'city' => "Paris",
            'firstname' => "Customer",
            'lastname' => "Test",
            'save_in_address_book' => false
        ];
        $billingAddress = $this->quoteAddressFactory->createBasedOnInputData($addressInputBilling);
        $this->assignBillingAddressToCart->execute($quote, $billingAddress, false);

        // Set shipping address
        $addressInputShipping = [
            'country_code' => "FR",
            'street' => ["55 shipping street"],
            'telephone' => "01223456789",
            'postcode' => "75001",
            'city' => "PAris",
            'firstname' => "Customer",
            'lastname' => "Test",
            'save_in_address_book' => false
        ];
        $shippingAddress = $this->quoteAddressFactory->createBasedOnInputData($addressInputShipping);
        $this->assignShippingAddressToCart->execute($quote, $shippingAddress);
        // Set shipping method
        $this->assignShippingMethodToCart->execute($quote, $shippingAddress, 'my_carrier_code', 'method_code');

        $payment = $quote->getPayment();
        $payment->setMethod('free');
        $this->resourcePayment->save($payment);

        $order = $this->quoteManagement->submit($quote);
    }
}

$script = new createOrder();
$script->execute();
In that example, we can see that we use the object manager in the constructor for creating several instances of specific repositories, or services that we later use in the execute method.
We simply programmatically create an order in that example using all the different services that it requires.
I recall that this script is only for testing and debugging your code. Directly using the object manager is not a good practice and we are using it here because dependency injection cannot be used.
That's all.
Magento 2 – Quick tip : how to log and debug easily
Whatever the development you are doing, and whatever the environment and technology you are working on, you always need to debug your code.
Let's debug Magento 2 with logs.
This is how i have been processing for many times in a magento 2 environment and coding with PhpStorm IDE.
First, i have added 2 simple live templates inside my PhpStorm IDE.
The first one will allow me to temporarily and quickly add a logging function inside my code :
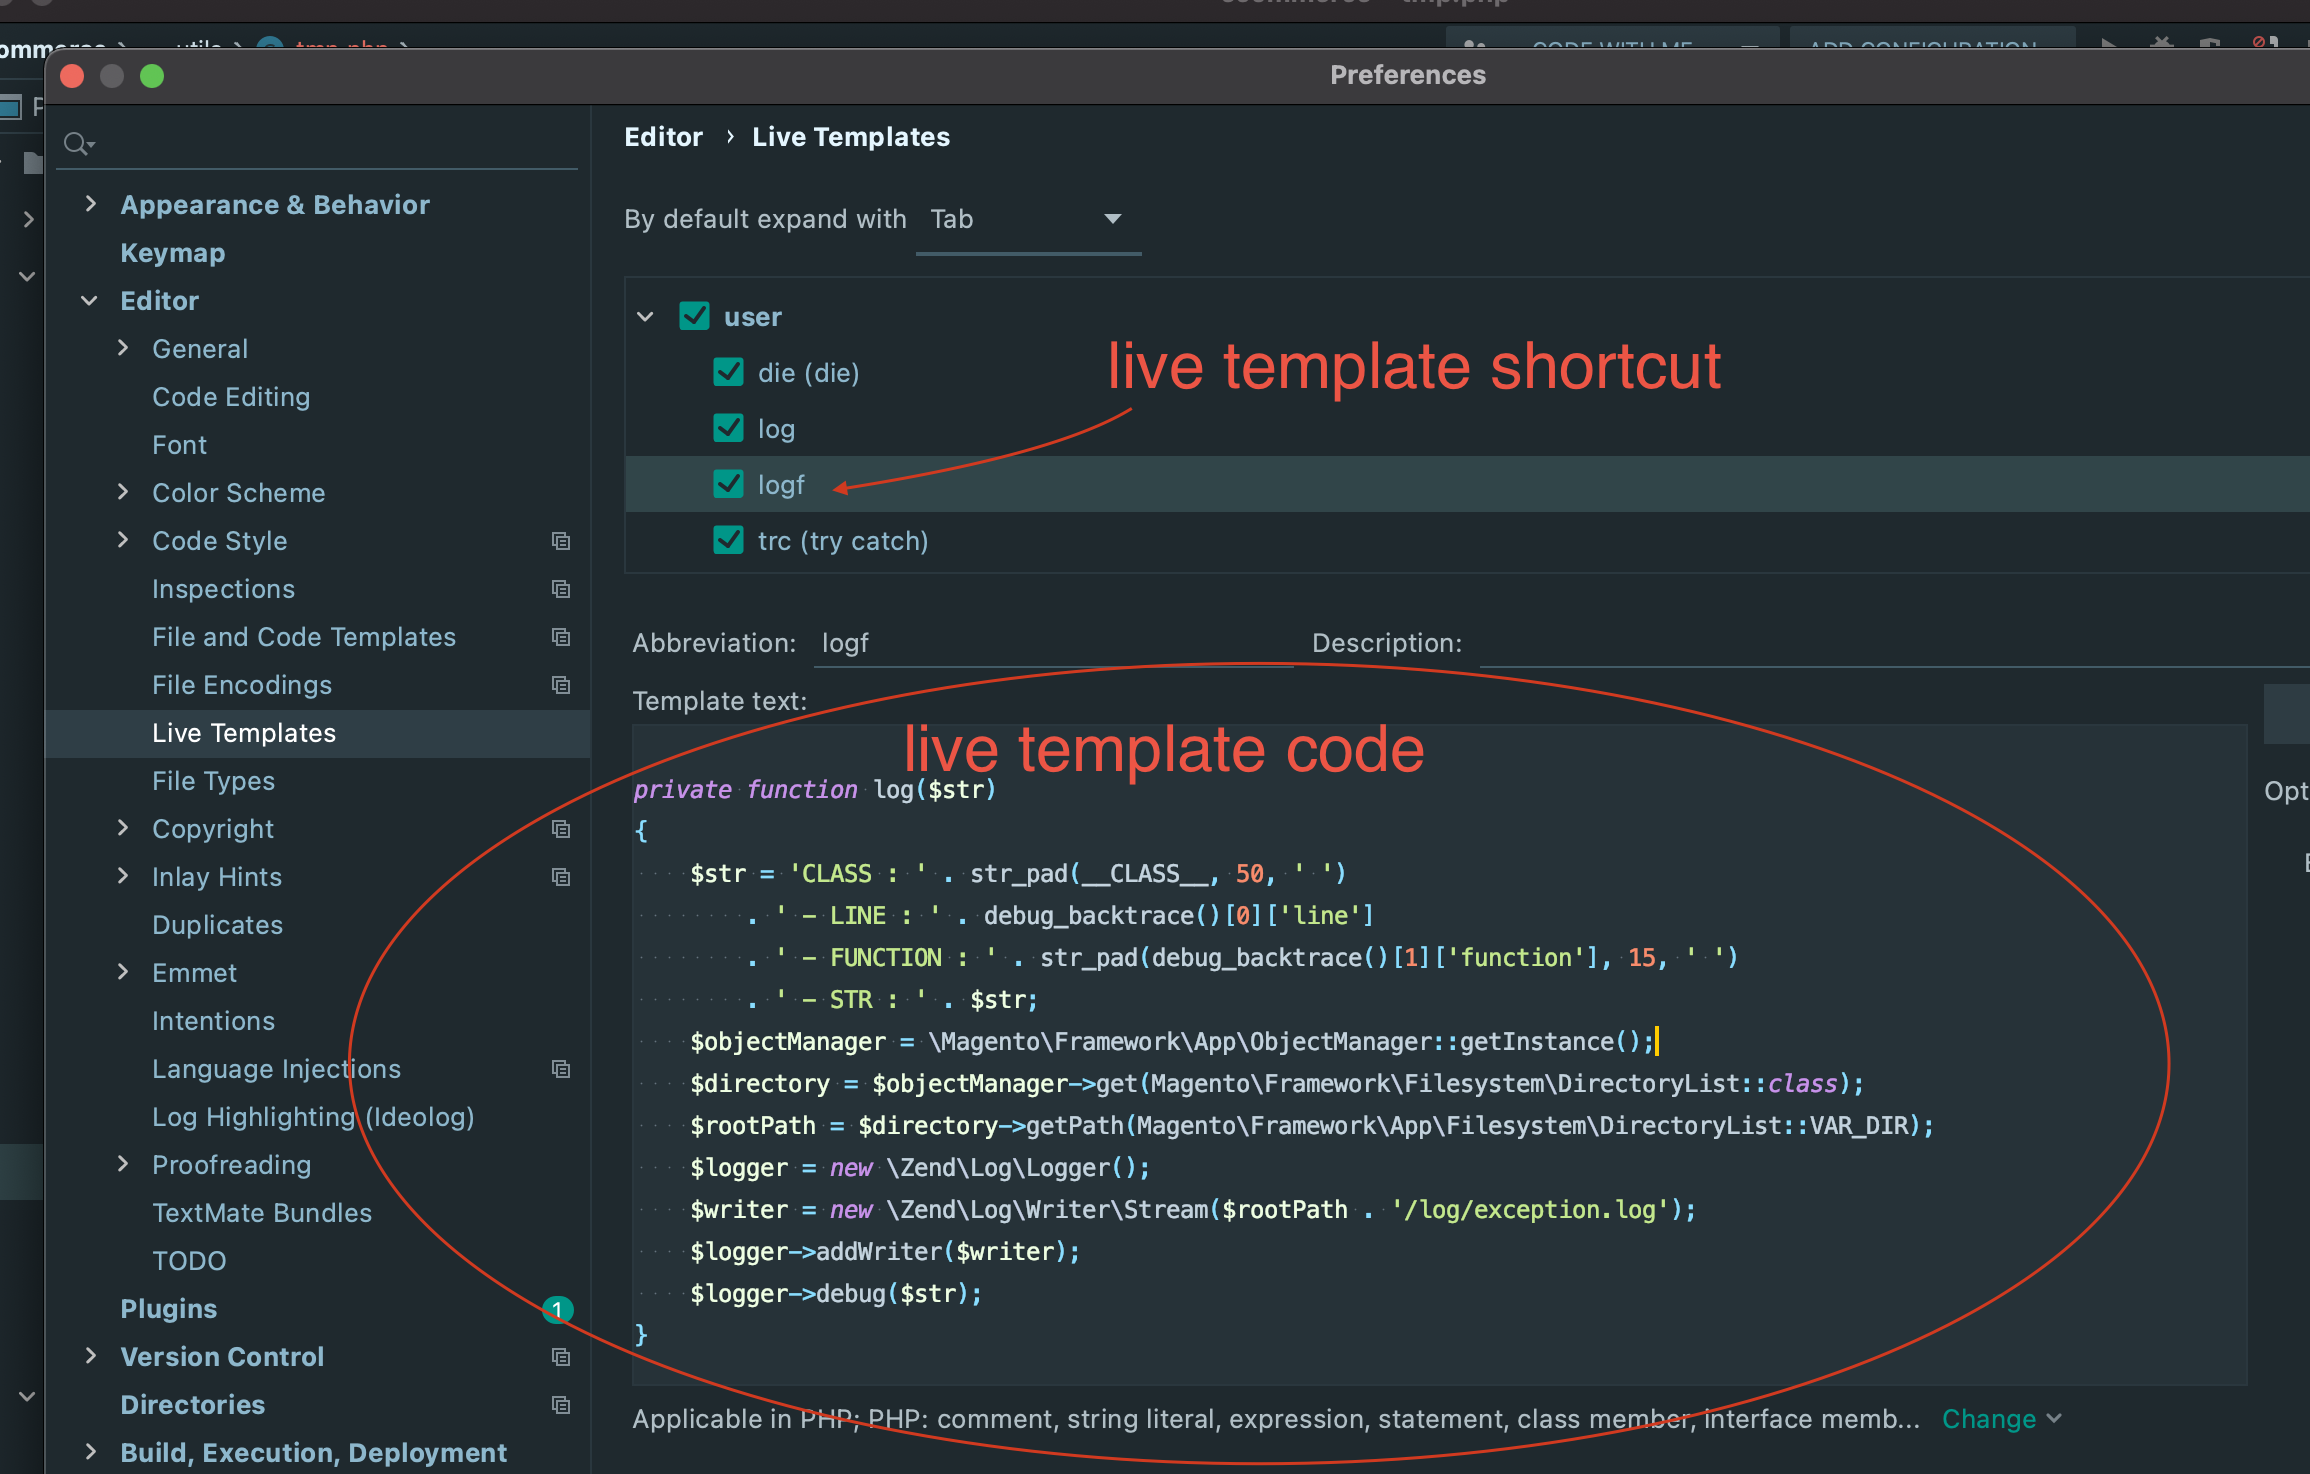
Here is the live template code if you need to copy paste it.
<?php
    private function log($str)
    {
        $str = 'CLASS : ' . str_pad(__CLASS__, 50, ' ')
            . ' - LINE : ' . debug_backtrace()[0]['line']
            . ' - FUNCTION : ' . str_pad(debug_backtrace()[1]['function'], 15, ' ')
            . ' - STR : ' . $str;
        $objectManager = \Magento\Framework\App\ObjectManager::getInstance();
        /** @var \Magento\Framework\Filesystem\DirectoryList $directory */
        $directory = $objectManager->get(\Magento\Framework\Filesystem\DirectoryList::class);
        $rootPath = $directory->getPath(\Magento\Framework\App\Filesystem\DirectoryList::VAR_DIR);
        $logger = new \Zend\Log\Logger();
        $writer = new \Zend\Log\Writer\Stream($rootPath . '/log/exception.log');
        $logger->addWriter($writer);
        $logger->debug($str);
    }
This logging function is not perfect but it allows you to log any info just like we could do with magento 1 and famous Mage::Log function. It also gives a little of contextual information, the PHP class, the PHP method and the line number where the log have been added.
Here is the second live template i have added :
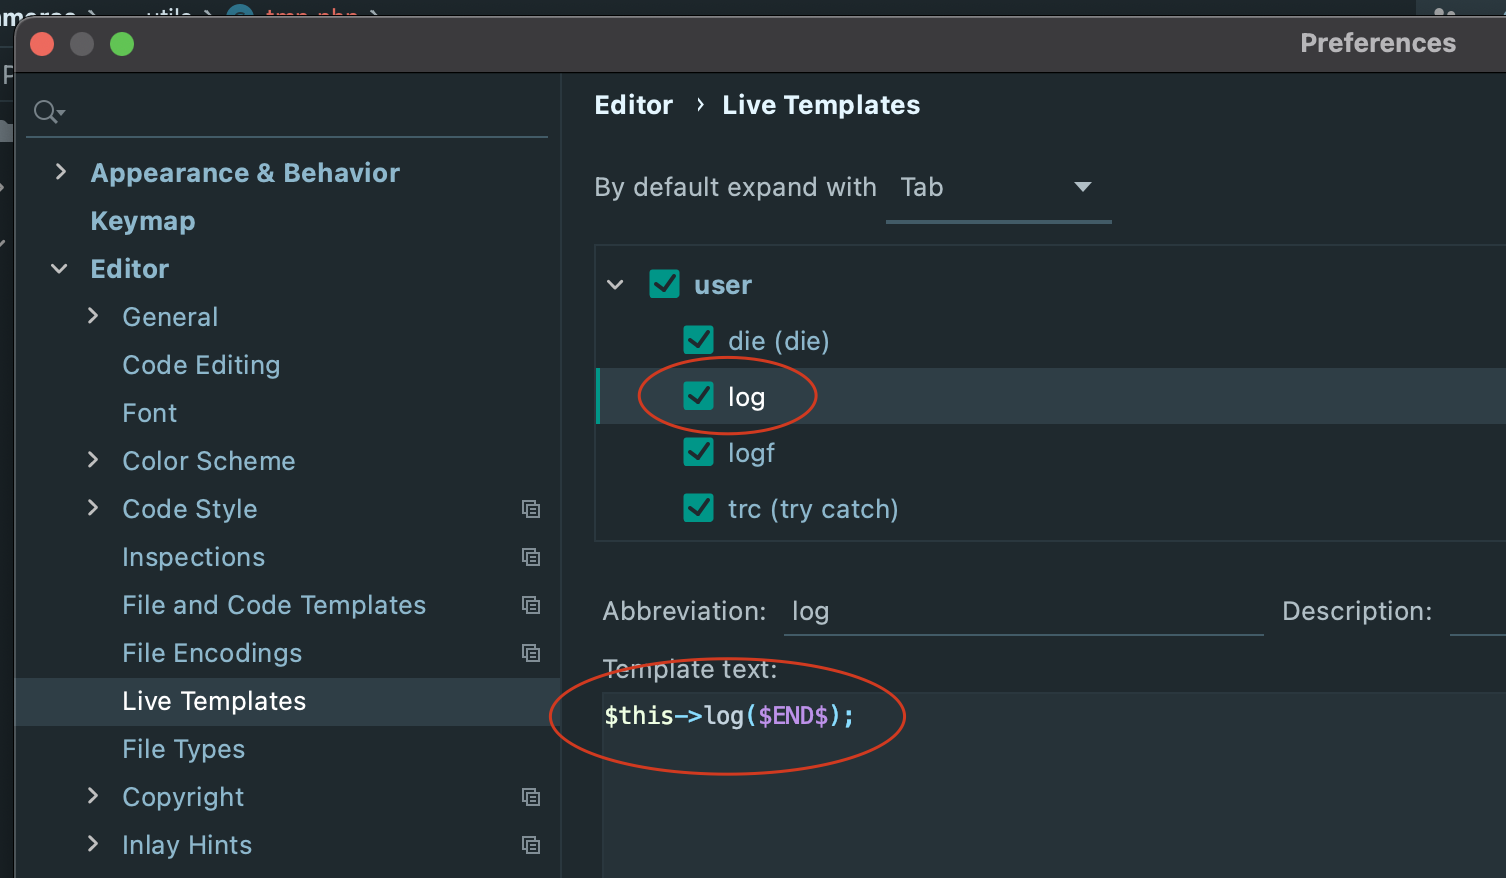
It allows to quickly add a log in the code.
With these 2 live template i can easily and quickly temporarily add log in my code.
Here is how you add the logging function in your code :
And here is how you call it from anywhere in your code :

After that you will just need to open you command line and start a tail -f var/log/exception.log command and you will see the logs coming.
And that's all. Please remember that this is very temporary and must not live inside production code (directly using object manager is not a good practice) so don't forget to remove this function and calls before commiting you code.